Follow this blog with bloglovin

Follow on Bloglovin

Followers

Please respect my

All work exhibited here is my own design, unless otherwise stated, in which case I shall have credited the original author of that work. I am thrilled to be able to share my designs with you but would appreciate that you respect that these are my designs and do not copy and place them anywhere else online or use them for your own personal gain in any way.


Google Website Translator Gadget

Monday, 28 June 2010

Exciting News


Well here I am with some exciting news.

I have just been picked to be a Design Team member for Crafty Cardmakers, which is a challenge blog for newer crafters and bloggers, although of course, anyone can join in. The blog alternates between a challenge blog one week and a Spotlight Zone the following week, which will focus on a technique, style, product etc to give you ideas on how to use or make a particular thing. The former challenges are sponsored and there will be prizes but the latter Spotlight Zone is just for the fun of playing along and trying something out, and who knows maybe learning something new. I am one of ten new members and 6 existing members who make up the team, and boy am I excited, so excited in fact that ...........

I don't officially start until July 12th, but when I saw what the team were putting together for this weeks' challenge I asked if I could add my card into the mix as I had been working on the theme already for a birthday card.
And well you know me, I like to look out as many challenges as possible. Well something's got to keep this old ME riddled brain firing.

So without further ado, my very first DT card for Crafty Cardmakers and the odd few challenges I picked up along the way


Crafty Cardmakers - Inky Fingers

Our Creative Corner - A colour theme of blue and green
Pile It On - Get creative with paper

ABC Challenge - X is for Xtra Dimension

Lexi's Creations - 3D

Kah-wink-E-Dink - Free For All
Digi Doodle Shop - Anything Goes

Sew Many Challenges - Anything Goes
Fresh Brewed - Anything Goes


This is how I put it all together

The background is Kanban paper and the image was made by sponging on Distress Inks in Stormy Sky and Mustard Seed. I drizzled a few drips of water on to create a more dispersed look and then overstamped with an Elusive Images Peacock stamp. When I had finished that it didn't pop enough for me to I decided to paint the peacock in with Starburst Stains. I used a combination of Hydrangea Blue, Jack in The Pulpit Teal, Wisteria Purple Blue and Marigold Yellow Orange. Appropriate as this particular challenge is sponsored by The Stamp Man!

I matted the image onto some glitter card in a toning colour and added a little peacock embellishment, which sadly was pink. Whoever heard of a pink peacock. Anyhow I tried to re-colour it with my promarkers but it ended up a purpley blue shade instead. I also stamped three peacock feathers in the top right corner, but the pic isn't showing them properly. I couldn't make it too fussy because it was for a bloke who likes birds, and yes I do mean the feathered variety. I do hope he doesn't think I'm implying anything. I mean just because he spends hours preening doesn't make him vain.

I hope you enjoy my first DT card as much as I did making it

Now if I can stop this darn pc from keep crashing I might just get this posted..... I need some new ram like NOW!!!

~ Lin ~

Tuesday, 22 June 2010

Now one for me ..


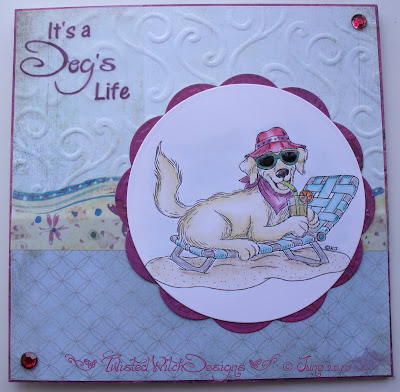
I just got this gorgeous new digi from Karen's Doodles.

What a 'cool' dog I love him. Reminds me of my lovely Bonnie who died earlier this year. We used to have a small pool in the back garden and she would insist on climbing the side and jumping in with my Daughter........ Scroll to the bottom for some pics - I can just see her being a naughty dog lounging on the lounger with a drink in one paw and a bone in the other.

Anyhow I fired up the prismas for this one. It's no good, I know everyone raves about promarker/copics and there is no doubt some people's work is amazing but for me they do great skin tones, but the rest not so good, I can get a better shaded image with my prismas. 'A bad workman always blames his tools' I can hear my Mum's voice in my ear now! LOL

I really enjoyed colouring him in after using the promarkers for so long. Might have to dust my pencils down for a few weeks!

Anyhow I started with a sketch from Truly Scrumptious which was nice and clean as I wanted the dog to really be the focal point, and not lots of lovely flowers etc.

This one rapidly turned into a multitudinous amount of challenges as it met so many of them.

So Truly Scrumptious - sketch Karen's Doodles Uk Challenge Blog - Summer (how could I not enter this one with one of her lovely images!)

Stamp Something - Something Summer

ABC Challenge - W is for Weather

Lexis Creations - Something Old - the stickers and safmat (more of those later)

Paper Play - Something Old - see above

Twisted Thursday - Something Old (great name TT!!)

Wee Memories - Let's Get Sticky

Pile It On - Stickers

Caardvarks - Embossing

Flourishes Boutique - Embossing

Crafty Ann's Challenge Blog - Embossing

Mark's Finest Papers - Embossing

La-La Land Crafts - Embossing (phew that's a lot of embossing)

Sweet Stampin Challenge Blog - Clean and Simple

Wow lots of challenges again.

The papers are both from Basic Grey; Wisteria for the bottom and errrr I forget the top one, eeeeekkk

I embossed the top paper with my BS and a Sizzix Texture plate and matted them both on top of the same Basic Grey paper that I used to cut the mat behind the dog image.

The layer covering the join between the two pieces is a very old sticker I have had since forever, from NRN designs. It's a vellum sticker and it just looked kinda like waves on the shore to me and fitted with the summer/beach theme of the image.

The sentiment I created with word and printed it onto Letraset's safmat (again had this for an absolute age - something old number two) and safmat is a way of making your own stickers and they go down virtually transparent so can also be used for that rub on look as well.

For a proper sunglasses and tumbler look I coated the lenses and the glass with diamond glaze, so now my too cool for school doggie has the sort of blacked out highly reflective eyes which leave you wondering what they are doing behind those sunnies, but I should imagine they are full of smiles at his lovely 'dog's life'. A couple of gems to finish and voila - who wouldn't want to be a dog!

I had fun with this, hope you like it too.

Bonnie Pics:-

We made a mistake with the filters and had to empty half the pool, as you can see Bonnie was eager to help with the drainage


and again here


Kids and dogs are apparently the same, impatient, and can't wait for the pool to be properly finished, as you can see in this series of pics there is only sand around the edge as neither of them wanted to wait for us to bed in some slabs!


Happy Memories. I miss my lovely dog.

~ Lin ~

Crafty Catz DT Final Sample - for now!!!

This is my final sample for Crafty Catz, and the second teddy design

Again it has been entered for a few challenges

Aly's Sunday Challenge - Flower power

Crazy 4 Challenges - Paper Flowers

Stamp Something - Something Summer

ABC - W is for weather

I had a lot of fun with this one. I started off with my new MS Deep Edger Punch, Garden Trellis, firmly in my mind and wondered what I could do with it to incorporate the teddy design. So I made a garden fence with it. I stamped a few trees in the background from a Kanban set of stamps in a mass of colours, and a row of grasses at the bottom and then laid the garden fence across the card. I also die cut a couple of different flourish designs to simulate the green tendrils of a climbing flower and added a few stamped and coloured flowers to the fence. I sat a promarker coloured teddy on top of the fence to finish it all off.

Phew finished, well for now at least :-))

It's fun being a DT member you get to try out lovely new products before anyone else does and hopefully show off a little of your imagination.

~ Lin ~

Crafty Catz DT 6

Here is my first teddy design for Crafty Catz as part of her Design Team Again I am entering it for a few challenges

Stamptacular Sunday Challenge - Cute as a bug as it has little bees on it


Crafty Calendar Challenge - Bugs & Beasties - again for the little bees

Aly's Sunday Sketch - Flower Power


Crazy 4 Challenges - paper flowers

Stamp Something - Something Summer

ABC Challenge Blog - W is for Weather - summer weather in this case


First I decided which nestie shape I wanted to use to cut an apeture and then having decided I stamped the teddy onto a plain white card and coloured him in with prismacolour pencils and OMS, I also sponged some distress inks around him as the white was a little stark. I then stamped several of the flower stamps and coloured them in with prismas too. I used some WRMK Tiffany's paper which I cut the apeture from and stamped some lovely flowing grasses on the bottom to look a bit like a meadow and a few little bees around the card and then raised it above the teddy on 3d foam tape to give a bit of depth. The flowers were just dotted around the edge of the apeture.

I have one more CC card to post

~ Lin ~

Crafty Catz DT 4&5

Here are my fourth and fifth butterfly designs for Crafty Catz, again using two different butterflies from the Butterfly Dreams stamp sheet.

This first one I made to match the challenges at:-


Allsorts Challenge Blog - I followed the lovely little sketch there


Stamptacular Sunday Challenge - Cute as a Bug


Crafty Calender Challenge - Bugs and Beasties


The lovely background to the butterfly is a paper doily, what a pretty design, and to think I thought these sort of thinks hideous in my youth, lol


The butterfly is stamped with stazon onto some very fine acetate, actually I think it's overhead projector acetate. Anyhow stamped and then flipped over to be coloured with promarkers as the pros would have made the stazon bleed if I coloured on the front. Then came the tricky business of attaching acetate to a doily with holes in it! I do like to set myself problems. Hopefully the legs of the brads are not showing through the doily. Oddly the doily is showing through the butterfly but then butterflies are quite etheral and some of them are almost transparent, so my butterfly obviously comes from that particular type!


Just one more butterfly to come and this one is not part of a challenge, but I thought I would add it onto this post. This was some lovely lemon card sort of like Bazzill Bling but cheaper! I ran through the BS with a butterfly texture plate and then overstamped it with the single wing type flourish from the stamp sheet. The little sentiment is also from the sheet. The butterfly was coloured with promarkers and sits on a glitter nestie pendant with matching border strip.

Five down, two to go ......... teddies that is.


~ Lin ~

Friday, 18 June 2010

Crafty Catz Design Team Samples and a few challenges - 3

My third and final Crafty Catz design team card that I have entered for some challenges, well for now anyhow! ;-) This one I have only entered for two challenges.

This first one is for the Colour Create Challenge Blog - Mad as Hatters theme.
They wanted you to use a white card and pick two colours from the fantastic Johnny Depp picture shown here, plus an optional extra of something from within that picture.

I chose the sort of orangey colour which makes up the hatters hat band and the yellow in the far outside tips of his bow tie. I also chose to represent the lace on his cuffs with a strip of glittered card made into a lace ribbon with a MS punch. The main colours are best shown on the sheet of DCWV shimmer card I used as the main background and the butterfly's colouring.

The second challenge I am entering with this is the Cuttlebog Spot, their challenge is to use embossing somewhere on your project, and they very generously stipulate that you do not need to use the bug to do so, so I used my bigshot and BS texture plate of happy birthday. The mat under the card ribbon is also embossed with butterflies but they got lost under the ribbon!

The butterfly was stamped onto white cardstock which I tinged with distress inks around the edge and it was coloured with my promarkers. I finished it off with a few orange gems down the butterfly's body to give it some dimension and just because I love all things shiney.

~ Lin ~

Crafty Catz Design Team Samples and a few challenges - 2


Another of my DT cards for Crafty Catz using her Dreamy Butterflies stamp sheet.

This one I am entering for the Challenge Up Your Life critter cratter and bling challenge, again, sorry, lol

I am also entering this one again for the Lexi's Creations - Something Old Challenge - the gilding flakes on the back of the butterflies I have had since Adam was a lad.

And Finally again, sorry Charisma Cardz Challenge - All About Bling - which I shall explain in a minute.


I had a great deal of fun with this card and copied a technique I saw just this week on Create and Craft TV. I think it was a show I recorded.

Anyhow the 'layered arches' mat was made by using cut n dry foam and splodging on randomly 4 different colours of Ranger Distress Inks. As this ink has a long open time it enables all sorts of lovely tricks. I then covered it completely in a gold coloured cosmic shimmer mica powder. Then I inked up the buttefly with a versamark inkpad and stamped it across the sheet. This had the effect of lifting the mica and leaving a buttefly image which was still sticky. To these butterflies I added a different mica colour in a sort of mauve shade. Then I cut it into a mat using the layered arches.


The background card has corners stamped from sort of wing flourishes also on the Dreamy Butterflies stamp sheet.
Finally the top butterflies were stamped onto acetate which I hade made self adhesive as explained in my earlier post below this one, and then they were cut out and gilded. I stuck them down on the mat and added black gems to their bodies to give them a bit of added depth.

Sadly the photograph doesn't pick up the lovely way that this shimmers with the mica powders so I hope it still meets the 'bling' criteria! ~ Lin ~

Crafty Catz Design Team Samples and a few challenges - 1


Pamela from Crafty Catz sent me some gorgeous stamps and I have been beavering away making samples on her behalf for shows on Create and Craft TV. Of course, being me, how could I not enter a few challenges along the way.

The first four cards have all been made using her gorgeous new Dreamy Butterflies stamp sheet.

This one I am entering for the Challenge Up Your Life current challenge of Critter Cratters and Bling....... what a wonderful expression, Critter Cratters. I hope they consider butterflies to be critter cratters!


Also I am entering it in the By The Cute and Girly Challenge as it meets their criteria of old, new, borrowed, and blue, the new in this case being the stamps, and the MS layered arches punches which were used to make the background mat, it also meets the old criteria as the back mat with the little butterflies on it I bought at Newbury Stamp Show about 5 years ago. I remember I just had to have it, and shared a pack with a friend, I doubt if I have used more than three sheets from that pack!


Lexi's Creations have a theme of something old, and as I explained above the glitter sheet at the back of the card is very old.


Finally I am entering it into the Charisma Cardz Challenge, which is All About Bling.


The card was made with some lemon coloured 12x12 card sliced in half and folded down to a 6" square card, onto which went my lovely old glitter card from Newbury, the next layer is also glitter card from QVC I believe, it has a sort of cloud pattern on it and from that I made the layered arches mat. The next layer was a bodge it job. I didn't have any self adhesive acetate so I made my own. I stuck a sheet of acetate to a double sized adhesive sheet and on to that I stamped the butterfly in black stazon. I gradually peeled the backing of and added diagonal stripes of glitter in different colours.
I love the flourishes within the wings of the butterfly, and throughly enjoyed using it.

Wednesday, 9 June 2010

By the skin of my teeth


Having been very lucky and won a gorgeous digi from Mo's Digital Challenge last week I couldn't resist entering again this week and it was in a similar vein to my last card with them, ie merging images.

Sadly, this week has been one of those that just keeps happening to me, if it can go wrong it will and so I have only just finished my card....... the daylight has gone here in the UK and my picture of my card is not the best lit one.

I merged both the boy and girl Bye-bye images riding away on their bikes and made it look as if the girl was ahead of the boy. Then it reminded me of me and my big Sister who I used to follow everywhere. So much so in fact that I almost lost a
finger in the mechanism of a deckchair because she kept moving away and I kept getting up and moving my chair to be next to her. Finally I got fed up of getting out of the deckchair and tucking my hands under the bit where it folds back on itself I humped the whole thing, including me, along the ground in a sort of bouncing motion and suddenly. SNAPPPPPPPPP it closed on one of my hands and nearly took my ring finger of my right hand clean off.

So my little girl is complaining to her Mum to tell him to stop following her.

Coloured with promarkers, matted with nesties on some lovely Basic Grey origins paper, a couple of bright felt flowers and a butterfly completed the card.


Sure do hope I make it over to Mo in time to post this!!!!!!!! The clock is ticking.........


~ Lin ~

Sunday, 6 June 2010

Biggest challenge ever


Well this week I have twenty three challenges. Wow, never managed so many before. But it was a little easier as lots of folks spotted the change in the weather and came up with the theme of Summer, one is a little out there in terms of whether or not it matches the theme, but the rest are in a similar vein.

So here goes

All these blogs have the theme of Summer:-

Cupcake Craft Challenges - summer delights
Everybody Art Challenge
Stampavie and More
Stampin For The Weekend - summer/travel
Raise The Bar - celebrate summer
Our Creative Corner - summer inspiration or what summer means to you
Paper Sundaes - summer fun

I used the sketch from Secret Crafter

Creative Inspirations have a beach theme

Order of the Opus Gluei - Life's a beach

Papertake Weekly's theme is Fun, Fun, Fun - what can be more fun than a day at the beach

Delightful Sketches are after texture and I hope I have achieved that with both the debossing on the background card and the little ocean embellishments

Tuesday Taggers - touchy feely texture with a prize on offer from Tanda Stamps

Meljen Designs require dry embossing, which is how I achieved the debossing on the background card, only back to front!

Oh, Alice! are after muchness! They want the heart of your stamping style. Mine is I guess the colouring. I like to use a variety of different methods for colouring, but since getting a full set of promarkers I have been lured into the promarker club and can't seem to pull away....... which reminds me I must revisit one of my other favourite styles soon.

Busy Beauties Creation Station a nice easy theme of Anything Goes

AIFactory again Anything Goes but with a punch!

Your Next Stamp wants a border punch and I used the layered arches stamp from MS to make the ribbon down the side.

Pixie Dust Studios - punch it out

Wee Memories
also have a theme of Punch It

The Pink Elephant
- 'Gotta Wear Shades' - use bright fun colours

Pile It On's theme is quirky and I think my little seahorses and fishes are quirky and I certainly piled it on so hope it qualifies

And finally my 'out there' theme

My Time to Craft are after 'Wild Thing' they want something that lives or grows in the wild. Sooooo I figured the ocean is wild to most of us, most of us never explore the deeps where exotic sea creatures live, sea horses flourish and there are shoals of neon coloured fish....... so my wild things are all the lovely ocean themed embellishments. These actually came from a children's beading set and oh what fun I have had with the various aspects of that kit. Revisting my childhood I guess.

The image is a combination of a couple of Magnolias from the Lazy Summer Days collection, coloured in with promarkers and the blue sky was dotted on with distress inks. The mat behind her is meant to represent the sun!

So there you have it, my 'biggest amount of challenges for one card' post to date..... and now you can all see what I spent my Sunday doing!

Happy Sunday evening everyone

~ Lin ~

Tuesday, 1 June 2010

Similar Challenges, different card


So here we go with some similar challenges but a different card! Again I used the 'no designer paper' theme of Cute Card Thursday this time with some paper I made myself. Firstly I used distressed inks to create a blue/green background which I then laid swirl masks over. I then went over the top of the masks with more distressed inks in wild honey and scattered straw leaving the original bluey green showing through where the masks had been. I also dripped some water on to move the ink around in some places.

This also, hopefully, meets the
Oh, Alice! criteria of swirls again. I certainly got messy creating these ones.

The third challenge I have entered twice is DP2 Challenge - Mo's again with a babies theme, and again I combined more than one image. I used Lacie with Ice cream which I flipped so she was facing towards the second image which is Kai in flower hat. They both look to be enjoying a lovely sunny summer's day which leads me to the next challenge of 'summer delights' from Cupcake Craft Challenges. The idea was to create a project showing what summer means to you. For me summers in my youth were endless, and although I only have a sister, she and I would sit in the garden soaking up the sun playing in the sandpit and licking down lollies. Whenever the sun is on my face it transports me back to those long, lazy days of my youth.

Creative Inspirations wanted distressing on the project, so the edges of my hand made paper and the mat are torn and distressed. It got a little more distressed than I intended when the image got stuck to the mat (also hand designed with inks) in the wrong spot and I had to prize it free to reposition it, so it distressed the mat with a large chunk of surface paper torn off! LOL

My final challenge for this card is Buttons and Blooms from
Secret Crafter. Whilst you are over there be sure and click on the blog header to refresh so you can look at the gorgeous new stamps she is showing. If you like Manga I am sure you will love these.

~ Lin ~

A new way of looking at Veggies


I have entered a couple of challenges more than once, with two cards with similar ideas. The first one is for

DP2 Challenge - Mo's which was to celebrate babies. I liked the idea of adding more than one of her gorgeous images together so I have put three of the 'Two' series of babies/toddlers on the same image because they epitomised a later challenge, which I will get to in a minute - all will be revealed, at least in my head it will!

The second concept on the card was not to use any designer papers, so I made my own! Or rather, I stamped directly onto a plain white card and used this as the background. This was required by Cute Card Thursday.

Oh, Alice! wanted swirls, which are all over the back of my 'make it yourself' paper and I did them in colours which I hope tone in with the image colouring

The final part of this card's challenge was for the Pile It On challenge blog which have 'Eat your veggies' as their theme and they have asked if you are going 'a bit out there' to explain. I only have one image, I think, that contains veggies and I really enjoyed their challenge last week so I put my thinking cap on and pondered what I could come up with, which is where Mo's badly behaved twos come into it. I have them all having a tantrum because Mummy said 'eat your veggies or you won't get any dessert' and being very badly behaved they are sulking, screaming and stomping because they hate veggies and want their puddings NOW!.

The card is a lot plainer than my normal style, but the image took up a large area of the card and it looked better, I thought, without too much on it.

The image was coloured with promarkers, the mat is punched with MS punches and the flowers are a combination of various paper petals put together to match the colour scheme.

~ Lin ~

LinkWithin

Related Posts with Thumbnails